I have never played hockey, but I have always liked it the most out of all sports since I was a child. We watched it on TV and often went to matches in Vitkovice and Trinec.
I started taking photos of sports soon after I bought my first DSLR camera – Nikon D3100. I first went to Frýdek to take photos of hockey, still in the old hall. It was a very old stadium with pure lighting conditions but a great place to start.
How to get to hockey as a photographer? It will not be possible to get to the Extraliga (the highest league in CZ) right away. Find a team in a lower league, find contacts on the web, and ask if you can come to take photos, and offer photos to them.
The lower league has many advantages:
- Most of them do not have a photographer, so they will be happy for photos.
- You will get to places where there are problems with accreditation even in the Extraliga (on the bench, just above the plexi, etc.).
- You never bother anyone.
But there are also a few disadvantages:
- The biggest problem is the lack of light. The lower league is usually played in smaller halls, where the lighting is very poor.
- Few viewers – empty stands are not an ideal background.
My experience is that everyone always tries to accommodate photographers, and I have never encountered any unfair behavior.
Equipment
We have briefly touched on the technique, so let’s take a closer look at this topic. It is said that good photographs are not about the technique, but about the photographer. It’s true, but sports photography is a bit of an exception in this regard. Quality technique is simply a condition where you need to focus on three main aspects:
High ISO – in the hall, you usually have to shoot at ISO 1600 – 6400 because you need a time of at least 1/640s or shorter.
- Fast-focusing – in 90% of cases, you will use continuous focusing, which places huge demands on autofocus (speed, accuracy).
- Telephoto lens – hockey can still be quite successfully photographed with a 70-200, preferably at f/2.8. But for example, 300 is already needed for football.
- Backpack – there is really a lot of it, so a proper backpack is a necessity.
- Straps – I personally like to have two cameras on me, typically a wide-angle and a telephoto lens, so I use BlackRapid’s “sling” which can comfortably carry even heavy lenses and their use is completely intuitive.
Over time, I got to the point where technology doesn’t limit me anymore, now it’s really just about hands and head. So I can’t make excuses anymore… This is what a typical hockey backpack looks like + all of my gear.


Settings
Every photo shoot starts with proper preparation. Always check that you have everything in your backpack, and most importantly, that you have enough charged batteries. It is necessary to realize that it is cold at hockey games and batteries do not last as long as they normally would.
Arrive at the venue with sufficient time and inspect the stadium. Players warm up before the game and so should the photographer. During the warm-up, set up your camera, think about where you will be shooting from, set the white balance, and check the histogram. Be aware that the lights are often not at full power during warm-up, so you need to double-check your settings before the first face-off.
This brings us to camera settings. Most sports photographers shoot in Manual mode, and it makes sense. I use priority modes exceptionally, especially for outdoor sports events. Priority modes do not work in hockey due to the very bright ice and dark players + the background of the audience. In addition, hockey has constant lighting conditions, which makes manual mode very simple (except for stadiums where each part is lit differently).
So what does my typical hockey setup look like?
Shutter Speed
Usually, you want to freeze the movement of the players – so the longest time is 1/640. However, this time still won’t freeze the movement of the puck during a shot. This doesn’t always have to be a bad thing, but if you want to freeze the puck as well, you have to go sometimes to 1/1200, and even that is sometimes on the edge for a shot from the blue line.
Hockey is not exactly a sport for panning and other experiments with longer times. Or more precisely – it could be experimented with, but if you want to alternate all typical photo positions, there is not much time for that, but there are no limits to imagination, and you should think about it and experiment.
Aperture
As low as possible – given that the light is always low. But beware, f/2.8 has a very shallow depth of field on FX. Sometimes, it is therefore worth closing the aperture, especially when shooting action in front of the goal. You don’t want the goalkeeper to be sharp, but the players standing right in front of him are not. However, I never go higher than f/4.
ISO
According to the histogram. Usually, it won’t go below ISO 1600 in the best halls. Even in the Ostrava Arena for the Extraliga, I shoot at ISO 2500.
Don’t be afraid of higher values. It’s better to have a little more grain than a blurry photo. Also, realize what dimensions you are exporting or printing the photos to. Nobody (except you) will examine the photos at 100% zoom.
Focusing
Basically, almost always continuous but the choice of the focusing point is more tricky. If you have a professional DSLR, I recommend 3D object tracking (with the center point or one above it). If your 3D is not reliable, then usually the upper middle point.
Sometimes it is really difficult to keep the focus point on the player, especially when focusing on the goalkeeper who moves and often kneels. Therefore, I definitely recommend not focusing with the shutter button, but with your thumb – it is also often called “back button focusing”. Then you have the advantage that you can release your thumb and continue shooting with pre-focus. Whoever learns to focus with their thumb will never want to focus differently again.
With the acquisition of a mirrorless camera, I thought I would use the automatic focusing point selection more, but for hockey and sports in general, it’s not very useful – it still happens that it selects a different player, fan, etc. So what’s great for portraits is still unusable for sports (at least on the Z6), so I typically choose the cross. The advantage, however, is that the points are up to the edge of the sensor, which one really appreciates.
Other settings
We shoot in RAW – it pays off
White balance – even if you shoot in RAW, it pays off, it saves time
Histogram – it should really be up to the right corner, look here and there for overexposure, and the ice should be close to them
Shoot in burst mode – the faster, the better (especially in hockey, it’s about where you capture the puck – it can be said with exaggeration that an action photo without a puck belongs in the trash)”
Photopositions
And now to the actual game. At most stadiums, you can shoot from four main positions, each with its own specifics. I recommend visiting all of them during the game.
First, one video of what it can look like from the photographer’s point of view
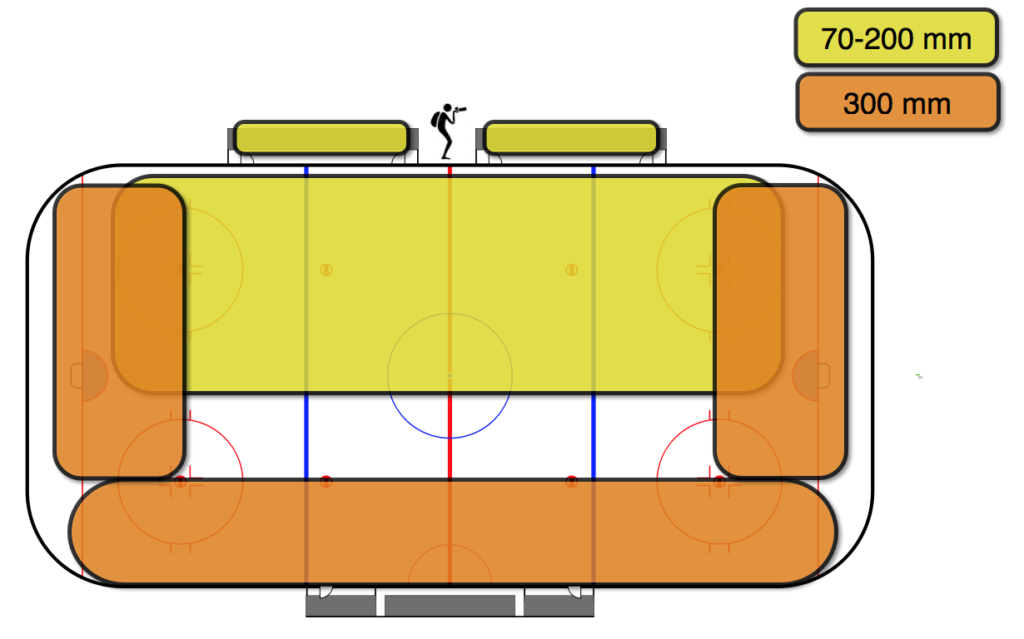
Between changing posts
I was used to shooting the first period from the position between the benches. Recently, plexi was added to most of the arenas, so it makes it almost not worthy. But if there is no plexi, this is my favorite place to be.
For all positions around the boards, it applies that you always want to get as low as possible with the lens. In hockey, you can’t kneel because you would already be too low (unfortunately, in CZ, there are no photo holes in the boards even in the Extraliga), but you can lean forward. Believe me, the lower you are, the greater the dynamics of the shots, the players are bigger, and you involve the viewer more in the game. Therefore, for example, in football, you should always kneel or sit (knee pads are an integral part of the equipment).
More or less, you will use only two telephoto lenses here. A 300mm focal length for action in front of the nets and for everything that happens on the opposite boards and in the corners.
On the other hand, a 70-200mm focal length allows for closer action shots, but for example, it is really far from the net (of course, you can make a crop). Of course, you can use a wide lens here too, but I save that one usually for other photopositions.
The picture approximately shows the typical areas for individual lenses on an FX chip.
For the photographer, the match starts before the first face-off. If you stand between the benches, you can capture the entrance to the ice and the opening ceremony.


The action in front of the net is a bit of a lottery. You have composed and focused (on the goalkeeper or defender). With your second eye, you watch what’s going on around you and wait for the moment. The use of the second eye is very important. Firstly, on a long focal length, you wait and need to predict a lot, and especially between the benches, you have to pay close attention and dodge when the game is played close to you or when the puck flies toward you (I’ve already been hit by both the puck and the stick). Also, watch out for players returning to the bench. When predicting the action in front of the net (reaction to a flying puck from the blue line), you can orient yourself quite well even by hearing – press and hold the shutter button in the moment you hear the boom of puck and stick.


A face-off in the attacking zone is a situation on the edge of a 300mm and 70-200mm lens. Here, again, the best strategy is sequential shooting at the moment when the puck leaves the referee’s hand.


A fixed 300mm lens captures the entire figure of a standing hockey player on the edge of the crease, or a player bent over during a face-off. But interesting shots can also be taken with it from closer action, which mostly involves expressions of emotions.


We are getting closer to the action and moving on to the 70-200mm lens. We have the opportunity to shoot both an attacker leaving the defensive zone and a defender defending their blue line. At the widest focal length, you can also shoot battles on the red line close to you, but that’s already quite difficult


Don’t forget about the bench, where there are always a lot of interesting things going on (coach’s instructions, fatigue, pain, emotions…). When shooting the bench, I very often quickly switch the camera to Priority aperture, quickly turn around, take a picture, leaving the exposure on automatic (with auto ISO – the bench is significantly darker than the field), switch back to manual, and continue shooting the game


The specificity of the area between the benches is the line referees. You will be surprised how many times you will photograph their backs, often at the worst moment.
Referees are also grateful objects, so try to capture them in important moments (decisions after consultation with the video referee, discussions with players, etc.)


Never lean over the boards. The only exception is the celebration of a goal when the players come to the bench. You should simply capture the celebration of the goal. Watch out for the ice under your feet.


There are stadiums where there is no space between the benches. In lower leagues, you can usually arrange with the players and coach and sit between the players on the bench – in that case, really be careful when the players change and protect your equipment.
From the side
“I shoot the second period from behind the glass, where the first position is from the side. Theoretically, a 300mm lens could also be used from here (action on the opposite boards, details), but I don’t really do that.
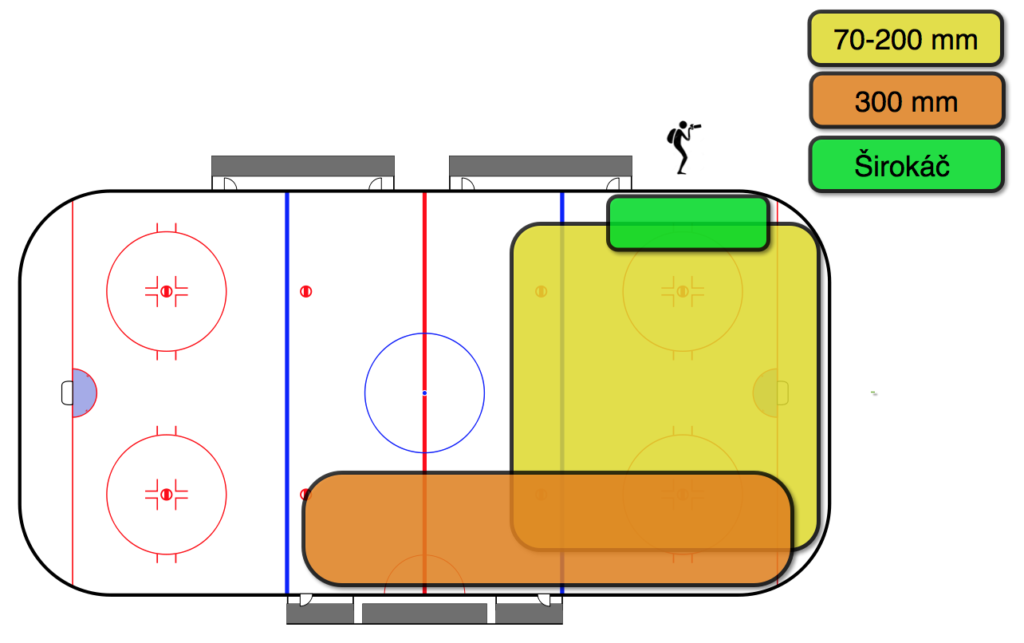
From this position, you go for other shots.
Let’s start with the action in front of the net (goalkeeper saves, battle for the goal area). Again, you usually have it pre-composed and wait for the moment.


Then focus on the action along the boards with the 70-200mm lens (especially battles along the rear boards) and action close to you with a wide-angle or fisheye lens (I usually have the fisheye lens on the second body, manually pre-focused, I just lift it up and press it blindly). The fisheye lens is a powerful tool, but it needs to be used really carefully, rather as a variation. Many people literally go crazy after taking a fisheye shot and overuse it.


It is necessary to realize that you are shooting through glass, which is of course an obstacle that reduces light, but above all reduces contrast and it introduces flares and reflections. This problem is more pronounced with increasing angle, which the lens forms with the plexiglass. Personally, I have the lens as close to the glass as possible (I rest it on the glass with the sunshade), I slightly close the aperture (f/3.5-4), and it is necessary to increase the ISO and really expose the shot on the edge of overexposure. It also helps to take a good look at the boards and find a clean spot (there are usually not many of them, but sometimes it’s nice to have a cloth with you and after the ice is cleaned between periods, talk to the organizers and go wipe the glass).”
Behind the goal

I only move here for a few minutes to get two or three photos.
- Shooting attacker on the blue line and between the circles
- Goalkeeper making a save
- Possible battles
The glass behind the net are usually extremely dirty and have puck smudges on them. However, most photographers do not shoot from this position at all, so you can have a unique perspective.
In addition, behind the net is usually a crowd that is very vocal, and you can take a few shots, even with a fisheye lens.


From a safety perspective, shooting from behind the glass is much safer, and you only need to be careful with your equipment. When you rest your lens on the glass and a body check comes, all the vibrations will be transferred to your body, which you really don’t want, and sometimes it hurts.
From the stands and audience
The perspective from the stands is not exceptional, but on the other hand, it is a “safe” position. Between the benches, the line referees obstruct your view, and from all positions on the ice, someone often enters your composition, etc. From the position in the stands, this does not threaten you. So if you need to take a photo of a specific player and be sure to capture them during some action, I recommend shooting from the stands.
The most commonly used lens from this position will be a 300mm lens, but I increasingly take a 150-600mm lens. It is a much less light-sensitive lens, but today’s professional cameras can easily handle ISO up to 10,000, and then this lens brings a completely different perspective.
You can shoot from the level just above the boards.


Or as high as possible under the roof.


But I simply don’t like this perspective, so I usually combine it with photos of fans, which you should never forget, you just have to capture their emotions, choreography, and how they have fun. A fisheye lens covering the entire stadium is also not a bad idea.


Other photopositions
After the game, there is usually a thank-you ceremony, which takes place towards the home crowd. It is not a bad idea to move on the ice after the game, kneel down, and capture any fish-eye shots – be careful that the players sometimes do not brake and come all the way to you.
It is mandatory to take photos on the ice even during celebrations. It’s always a bit of a fight for position, but always be considerate of other photographers, especially if you’re only shooting for your pleasure. After all, they must have that photo, and if you inconsiderately get in their way, you’re just stirring up trouble.
If you are not sure if you can go on the ice after the game, ask before taking any photos.


A specific thing is a remotely triggered camera with a fisheye lens placed in a special box in the net – I haven’t tried that yet.
In general, a position with a remote trigger, for example, directly above the net, brings a completely different perspective, but it already requires very good relationship with the organizer. In addition, the waste is basically 99% of the shots, but the 1 out of 100 (sometimes out of 1000) is worth it.
In hockey, you can also experiment with long exposure, panning, or multiple exposures, but it’s always a big lottery that takes a lot of time.


Specific for comercial (official) sports photography
Sport photography is a reportage photography, and in reportage photography, the focus is on current events. In practice, this means that you must deliver a few photographs during each break between periods in hockey (I would never promise more than 10 from one period). You must then deliver the complete set as quickly as possible after the end of the game. This puts a great emphasis and pressure on the selection of shots and post-processing. Here is an article about my recent official photography in Vítkovice.
Here is my process:
- Fully charged notebook
- Formatted memory cards
- White balance before the game
- Selection of photos directly in the camera = I use locking only on the shots I want to keep (I always do this when there is time – there are many interruptions in hockey), I delete the rest using the “Delete all” function at the end of the period.
- Immediately after the end of the period, I sit in the nearest seat in the stands or run to press center
- Import photos (usually there are about 20-30 left in the camera after the period)
- Selection of photos using ratings (usually 10 per period)
- Cropping – don’t be afraid of cropping, it is completely permissible and appropriate in reportage photography (watch out for compositional rules, I personally only use the original aspect ratio or square). I never retouch anything, which is absolutely unacceptable in sports reportage photography from my point of view.
- Automatic photo editing. Yes, I really press that magic button.
- Correction of automatic editing = usually I add saturation, contrast, adjust curves, or lighten. Automatic editing is basically a time-saving starting point. I use Aperture for editing.
- Export to web resolution
- Upload to web storage – it is good to have your own internet connection via mobile. Do not rely on the connection in the press center. In addition, you don’t even have time to get there between periods.
- Sending the link
- Inserting a new memory card. The old one goes into the bag as a backup.
- If there is time, then editing the rest of the photos
- End of the game, thank-you ceremony photographed, so quickly to the press center, edit the rest of the photos, and send the complete series.
- Pro focení na objednávku je typické, že nutně potřebují fotku konkrétního hráče, trenéra, atd. (chystají se s ním udělat rozhovor či o něm napsat článek). Takovou fotku pak prostě musíte udělat, omluva neexistuje.
Also, make sure to find out in advance if the game is something special (for example, if the opposing team is led by a coach who has also coached the home team for a long time) – you should definitely not forget about this.
A few more tips
- A monopod is useful for a 300mm lens (if you have a large 2.8)
- When photographing several games in a row (tournaments), you will appreciate gloves (I personally use work gloves with the thumbs and index fingers cut off)
- A photo bag is better, a backpack can be quite obstructive (this applies generally to all sports, especially when shooting from the stands), and it is easier to change lenses with a bag. Therefore, I often take a backpack with everything in it, leave it with other things in the press center, and take only what I need to the field.
- Forget about flash and hockey (maybe just for photographing spectators)
- Rosters are distributed before the game. Take one, it is useful for metadata.
- Don’t be afraid to ask more experienced colleagues at the stadium. They are always happy to help and advise.
Conclusion
Like every sport, hockey has its specifics. It is important to understand it and know the rules, otherwise, you will not be able to react and predict. The next step is to know the team you are photographing. Over time, you will know which player often solves the situation with a feint and who shoots immediately.
A hockey game is a story, so try to capture it as a story. Nobody is interested in thirty similar photos. Capturing a goal is luck, don’t despair if you don’t take a photo of it. Always try to think in advance what photos you want to take, from where, and when. A good story has more actors, themes, and emotions.
Why did I write this article? I don’t consider myself an expert in hockey photography, but when I started with it myself, I was looking for a similar article and I couldn’t find anything. So why not share my own experience?
At the end, one more video – funny one.